By Branndon Pike
Objective:
This guide will focus on a zero-knowledge base implementation and assumption that its readers have little to no experience with GNU/Linux software or Linux Distributions. In this guide users will learn how to correctly partition Hard Disk Drives (HDDs), protect the installed data with Full Disk Encryption (FDE) and install the rolling release distribution of Arch Linux, as well as other packages that will get the user up and running with a full graphical user interface and desktop environment.
Getting started.
Before you insert your install media you should have a general understanding of your computer Basic Input Output System (BIOS) or Unified Extensible Firmware Interface (UEFI). In this guide we will cover the usage of a BIOS enabled machine.
1. Booting Install Media
Place your CD-ROM into the optical disk drive or insert your USB device into a USB port of your machine. Press the power button to start the machine and select the BIOS hotkey from your manufacturer that will allow you to choose what boot device to start from. Depending on which manufacture you have, your Boot Media selection options may vary (See images below for examples)
|
Dell |
HP/Compact |
Lenovo |
|
|
|
|


Once you have selected the media you wish to boot you should be greeted with an Arch Linux boot prompt asking you to select an option. Your screen should look something like this:

Using the Up, Down and Enter keys on your Keyboard, highlight and select the option that reads:
Boot Arch Linux (x86_64)
After you select this option, you will see a series of system checks. Once this process is finished you should see a Terminal prompt that reads:
root@archiso ~ #
This is your indication that the Live OS has finished booting and you are ready to start issuing commands.

2. Validation of Network Access
You will need to be connected to the internet; For you to install this operating system you need to be able to download and install packages from Arch Linux mirrors. To check that the OS has detected your Ethernet cable, you can issue the command ip addr.
The Command Line Interface (CLI) command IP is used for bringing network devices up and down. The option ADDR (or Address), will list all possible network connections that are UP or DOWN and print the Internet Protocol Address of each successful connection established. Once the command has been issued you should see something similar to the image below.
***NOTICE***
THE IP ADDRESS LISTED IN THE EXAMPLE IMAGE MAY NOT REFLECT WHAT YOU SEE ON YOUR SCREEN

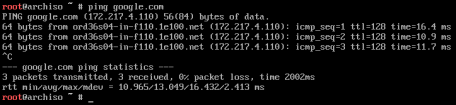
Once a valid network connection has been established and verified, you will need to ensure that you are able to reach the outside world and talk to servers outside of your internal network. This will be done with the CLI command PING. Ping is used the same way in GNU/Linux as it is in all other operatizing systems that support it. In this example we will ping Google:
root@archiso ~ # ping google.com
If you are connected to the internet, your command output should look like the image below.
3. Setting the System Clock
Time is a very important aspect of Linux; it ties into security, software updates and communication. To ensure that our system clock is correct, we will enable the Network Time Protocol (NTP) with the following command:
root@archiso ~ # timedatectl set-ntp true
4. Partitioning the Hard Drive
We will be splitting the drive into 2 partitions. The first will be the boot partition and, the second will cover the main partition that will house your OS and personal files.
First, we need to identify what disk we will be partitioning. This can be done with the CLI Command FDISK using the lowercase ‘L’ option. Issue the following command:
root@archiso ~ # fdisk -l
The output of this command will list all disk detected by the OS.

In most cases /dev/sda will be the disk you will chose to format. As you can see by the drive space of this example, one drive is 30GB in size while, the other is less than half a GB in size. We want the larger partition in this setup. Results may vary depending on the machine you are installing Arch Linux on.
For the remainder of this guide, we will use disk labeled SDA.
The following CLI software CFDISK will allow us to partition the disk /dev/sda. Issue the command that follows:
root@archiso ~ # cfdisk /dev/sda
If your computer did not have an operatizing system installed on it before, or this is a new hard drive, you will see a screen with the message “Device does not contain a recognized partition table.”
For the use of this guide as stated before, we will be using a BIOS based configuration. Thus, if given the option of selecting a partition table label type, we will select a DOS (Also known as Master Boot Record) partition.

Using the Up, Down arrow keys, you will be able to navigate the menu options of the partitioning software. If your machine is brand new, or virtual you will need to first create a new partition. Move the cursor over the menu item that says [ New ].

Hit the enter key and you will be asked what size you would like. To create the boot partition, we only need 100 megabytes of space. Type 100M and hit the enter key again. Select [ Primary ] and hit enter again. After that, we need to use the arrow keys again to select the option [Bootable]. This will tell the computer that the partition on the disk can be booted. Once done with this step your screen should look something like this:

Using the arrow keys again, move the selection to Free Space and select [ New ] again. Hitting the enter key will ask you how much space you would like to use, for this case we will use the remaining 29.9 gigabytes of this disk. By default, the leftover disk space should be automatically entered in the size prompt. Hit the enter key and select [ primary ] once more. Hit enter to confirm.
Next we need to select [ Write ] to save our changed to the disk. You will be prompted to type the completed word ‘yes’ to confirm you wish to save changes.
When you are done, you will be given a screen that looks like this:

5. Full Disk Encryption
We will be using the CLI command CRYPTSETUP to encrypt our primary partition that contains our OS and personal media files.
To create a cryptographic device and mapper device in LUKS encryption mode, we will need to execute the following command
root@archliso ~ # cryptsetup –verbose –cipher aes-xts-plain64 –key-size 512 –hash sha512 –iter-time 5000 –use-random luksFormat /dev/sda2

You will then be prompted with a conformation asking if you are sure you wish to overwrite the data on the disk. Type in all capital letters “YES” and hit the enter key.
Once done you will be asked to enter a passphrase. It is important to note that in GNU/Linux operating systems, when entering a password or passphrase you will not see any text, asterisks, or other output now. This is normal. You should create a passphrase that is complex and not used with any other login information or accounts. Passphrase complexity for today’s standards should consist of the following:
- Based on a phrase (a sentence or part of a sentence) that you can remember but which is not easily guessed and is without personal meaning
- A minimum of 16 characters
- At least one capital letter
- At least one Number
- At least one special character (!@#$%^&*()_-?:”{}|,./;’[]\)
- Do no use Personal Identifiable Information (PII)
Once you see the phrase Command successful that means your passphrase has now been accepted and you are ready to proceed to the next step.
Next you will need to unlock your newly encrypted partition. The following CLI command CRYPTSETUP will be used again for this action. Enter the command below and you will be prompted for the same passphrase you just created.
root@archiso ~ # cryptsetup open –type luks /dev/sda2 cryptroot
This will allow the data on the encrypted drive to be read and written to. You should see output from the CRYPTSTEP command that looks something like this:
![]()
6. Creating the file systems
In this section we will format both partitions to the EXT4 file system format with the CLI command MKFS (Make File System)
The boot partition creation command is as follows:
root@archiso ~ # mkfs.ext4 /dev/sda1
The encrypted disk partition creation command is as follows:
root@archiso ~ # mkfs.ext4 /dev/mapper/cryptroot
7. Installing basic software packages
Now that our partitions have filesystems, it is time to mount them to the live operating system.
Using the CLI command MOUNT we will mount both the mapper and boot partitions to the correct locations.
This command will mount our encrypted mapper drive to the /mnt directory
root@archiso ~ # mount /dev/mapper/cryptroot /mnt
Next we will need to create a folder for our boot partition inside the /mnt directory with the following command:
root@archiso ~ # mkdir -p /mnt/boot
Next we mount the boot partition to the new folder with the following command:
root@archiso ~ # mount /dev/sda1 /mnt/boot
Now that our partitions are correctly mounted to the right locations, we can begin to install the Arch Linux operating system to the hard drive. The CLI command PACSTRAP will pull the latest packages from archlinux.org and its mirrors to ensure we are running on the most up-to-date version of software available to us.
We will be downloading the following software:
- Base
- Base-devel
- XORG-apps
- Gnome
- Gnome-extra
- Networkmanager
- GRUB
- Firefox
This software will be enough to get you started with the basics of a GNU/Linux distribution.
The command is as follows:
root@archiso ~ # pacstrap -i /mnt base base-devel xorg-apps gnome gnome-extra networkmanager grub firefox
Pacstrap will now start pulling all packages from the mirror and install them once it verifies all packages downloaded correctly and are not corrupted. You will be prompted by pacstrap to choose defaults for some packages. In this guide, all defaults or 1st options will be chosen. Once pacstrap has gathered all input from the user, it will ask if you are ready to procced with the installation. Select the Y key and press enter. Pacstrap will now download and install all requested packages.
Once finished, pactrap will close itself and return you to the prompt.
8. Chroot Arch Linux Virtual Environment
Before we begin, we must generate a Universally unique identifier for our new Arch Linux install. This can be achieved with the CLI command GENFSTAB. The -U option will tell the command to generate UUID’s for this environment. The command is as follows:
root@archiso ~ # genfstab -U -p /mnt >> /mnt/etc/fstab
Next we will use the CLI command CHROOT to execute commands within the fully installed Arch Linux OS without the need to reboot into native OS on the hard disk.
The command is as follows:
root@archiso ~ # arch-chroot /mnt
If done correctly, your new prompt will have changed from:
root@archiso ~ #
to
[root@archiso /]#
![]()
9. OS Configuration
In this portion of the guide, we will configure and create various points within the chroot environment.
The following configuration files will be edited
- locale.gen
- localtime
- sudoers
- grub
- mkintcpio.conf
The following files will be created:
- hostname
- locale.conf
First we will edit the configuration of locale.gen. For this guide, we will use the English in the United States. We will use the CLI command SED for quick editing to remove a character from the file. The command is as follows:
[root@archiso /]# sed -i ‘s/#en_US.UTF-8 UTF-8/en_US.UTF-8 UTF-8/g’ /etc/locale.gen
Next, we run the CLI command LOCALE-GEN. This will read the configuration file in /etc/locale.gen and discover that en_US.UTF-8 has had the # sign removed from that line. By removing the # sign, or ‘un-commenting’ the configuration file will recognize the string of text as actionable data. The command is as follows:
[root@archiso /]# locale-gen

Next, we will create a new configuration file to instruct the system as to what language it should be using. By issuing the CLI command ECHO, followed by the output option > we can direct the command to output the printed information into a file.
***WARNING*** THIS COMMAND WILL OVERWRITE THE ENTIRE CONTENTS OF THE FILE.
The command is as follows:
[root@archiso ]# echo LANG=en_US.UTF-8 > /etc/locale.conf
Now that the new configuration file has been created we can export to system with the following command:
[root@archiso /]# export LANG=en_US.UTF-8
Now that the Arch Linux environment knows what language to use, we can move on to setting the system clock and setting our time zone. As stated before, time is very important to the OS. Misconfiguration can lead to the user not being able to install new packages or upgrade old ones or seeing the wrong time on their clock. Time zones are broken into Nation, State, City. If your city is not found, simply use the nearest major city that shares the same time zone as you do. This is done with the following command:
[root@archiso ]# ln -s /usr/share/zoneinfo/Nation/State/City /etc/localtime
Next, we set the hardware clock to read from Coordinated Universal time (UTC) with the CLI command HWCLOCK. The command is as follows:
[root@archiso /]# hwclock –systohc –utc
Now that the local time and system clock have been set, it is time to give your Arch Linux machine its own hostname. This is done with ECHO and printing its output to a new file.
[root@archiso ]# echo YourNameHere > /etc/hostname
Your Arch Linux machine, like most UNIX based operating systems, has an account that can make changes to 100% of the OS and perform all system functions. This account is known as Root. By default, there is no password currently set for Root. This is in not in best practice, much like having a default login for any local or online account. To change the password of Root account we will use the CLI command PASSWD. The command is as follows:
[root@archiso /]# passwd
As stated before in this guide, when typing passwords or passphrases into a terminal, it is normal for you not see text output or asterisks. You will be prompted to type your new password and retype for confirmation. If done correctly you should see a message indicating success.
Operating your Arch Linux machine as the Root user is possible, however, not always a good idea. Next we will create a normal user account that assigned to a group that is permitted to temporally elevate its access in order to execute commands as root only when needed. The CLI command USERADD will allow us to create a user account in the correct group. The command is as follows:
[root@archiso ]# useradd -m -G wheel -s /bin/bash/ yournamehere
Next we use PASSWD again to change the new user you just created.
[root@archiso /]# passwd yournamehere
Again, no text will be shown while entering the password.

Now that our non-root user has been created, we need to edit our sudoers file. This configuration file allows groups of users to elevate privilege in a temporary fashion to allow root level changes to made with password protection. Fort this step we will use the CLI software based text editor called NANO.
Other text editors are available and offer a wide range of features, however for this guide we will focus on the use of one editor to allow quick and easy modifications to be made without diving into a great deal of detail. The command is as follows:
[root@archiso /]# nano /etc/sudoers
Once the command has been executed, you should see your screen look similar to this:

Using the arrow keys, scroll down until you find the line starting with # %wheel ALL=(ALL) ALL
Remove the # symbol from the line. Your configuration file should now look like this:

To save the configuration file, you need to type the keyboard shortcut [CTRL] + [X], this will bring up the save menu.

You will be prompted with Yes, No or [CTRL] + [C] to cancel. Press Y for yes.
It will then ask you what name and directory you would like to save this file as.
Since we are editing a file, we must not make any changes here. Pressing enter will close out the software and save the file.
![]()
Now that you have edited your first configuration file using NANO, we can move on to the next configuration file. First, we need to edit a file that pertains to what will be the bootloader for our OS, GRUB.
Using NANO again, open the directory /etc/default/grub. The command is as follows:
[root@archiso /]# nano /etc/default/grub
You will see a configuration file that looks like this:

We will be editing the line reading GRUB_CMDLINE_LINUX=””.
In the double quoted area of the line add “cryptdevice=/dev/sda2:cryptroot”
Your configuration file should now look like this:

Press the keyboard shortcut [CTRL] + [X], then [Y] followed by the enter key to save the file.
Next we need to enter a hook in the MKINITCPIO configuration file using NANO again. The command is as follows:
[root@archiso /]# nano /etc/mkinitcpio.conf
The configuration file will first look like this:

Notice how the configuration file is broken into sections labeled:
- Binaries
- Files
- Hooks
We will be editing the last line of the Hooks section. The line should look like this in your configuration file:

In this line, find the words ‘block’ and ‘filesystems’ and place your curser between them using the arrow keys. Insert the word ‘encrypt’ between the two words.

Using the keyboard shortcuts [CTRL] + [X], [Y] and enter, save the configuration file.
Now that the MKINITCPIO configuration file has been edited, it’s time to execute the CLI command for applying the configuration. The command is as follows:
[root@archiso /]# mkinitcpio -p linux
Once done, you should see a line at the bottom that reads ==> Image generation successful

On to the bootloader. GRUB is the bootloader we have selected for this guide. It requires two commands to set up and is one of the easier and more commonly used bootloaders in GNU/Linux distributions. First, we point GRUB to the disk (not partition) that we want it to read at boot:
[root@archiso /]# grub-install /dev/sda
Next, we run the configuration script and point it to output the text to a grub.cfg file located in the /mnt/boot directory that we mounted /dev/sda1 (our boot partition) to.
[root@archiso /]# grub-mkconfig –output /boot/grub/grub.cfg
Now we have two final commands to input before we are ready to exit the CHROOT environment. These two commands will be using the CLI command SYSTEMCTL (System Control). This command has the power to start and stop, as well as enable or disable system services. The two services we will be enabling are “NetworkManager” and “GDM”. The Network Manager service allows for automatic DHCP discovery as well as a graphical interface for managing your network connections, proxies, and VPN services. The Gnome Desktop Manager (GDM) is a Desktop Manager or Login Manager, that will start after Arch Linux is booted fully. This will replace the need to log into a terminal and start the XORG-Server manually.
The commands to enable these services are as follows:
[root@archiso /]# systemctl enable NetworkManager
[root@archiso /]# systemctl enable gdm
You are now ready to exit the CHROOT environment.
[root@archiso /]# exit
Your terminal prompt should now return to this:
Next we need to un-mount the two partitions from /mnt and /mnt/boot. The commands are as follows:
root@archiso ~ umount /mnt/boot
root@archiso ~ umount /mnt
Now we close the CRYPTSETUP
root@archiso ~ cryptsetup close cryptroot
Lastly, we reboot the system with the following command:
root@archiso ~ reboot
Congratulations! You have now completed your Arch Linux install with Full Disk Encryption. It is now safe to remove your installation optical or USB media from the machine, and boot into your new, encrypted operating system.
Authors note:
I would like to thank the following people for the wonderful job they did in providing proofreading and peer review services for this guide:
- Cerebral Mischief
- Charles Shirer
- Th3j35t3r
- Morten Linderud
- Nicholas [REDACTED]
- ProxyBlue47
- 0x Waxwing
- AuntieMel
- N.M. (Anonymous)
- Mischa Maha
- Sam Bingner
- As well as the others I forgot to mention!
I hope you found this guide useful. If you have any comments, questions or corrections you would like to make, please feel free to contact me via https://twitter.com/BranndonEPike
